Git 速成入门指南
由于网上的教程要么啰嗦,要么太过随意、太旧,所以写了这篇指南,尽可能取得实战能力、原理理解、学习效率的平衡。
什么是 Git?
Git 是一个文件管理工具,用于需要处理文件合并、更新等操作和这些操作的追踪。想象你在写一个程序,这个程序涉及到 A, B, C… 各个源代码文件,有一天,你修改了文件 C,然后重新发布了程序,突然你发现这个修改会导致严重的 BUG,你必须恢复到原来的文件,于是每次修改你都要把当时的源代码保存一遍,非常麻烦。或者假设有很多人帮助你开发这个程序,你就要手动合并他们提交的代码。有了 Git 之后,我们可以方便地管理代码的各个版本、管理其他人的合并等等。
前置知识
学习之前,你需要知道:
-
常用的 Linux 命令
-
Vim 编辑器基本操作
注册一个 Github 账号
Github 是一个在线的代码托管平台,使用 Github 你可以将自己的代码推送到服务器,或者从服务器下载代码。类似的平台还有 Gitee、GitBucket、Bitbucket 等,他们都支持 Git。此外你也可以自己搭建一个代码托管服务器。
为了我们后面学习过程中方便演练各种操作,需要你注册一个 Github 账号,或者使用你有的账号。
访问 GitHub: Where the world builds software · GitHub,点击 Sign up 按钮进入注册页面,填写必要的信息进行注册。
安装 Git
我们以 Linux(Ubuntu)系统为例。执行:
1$ sudo apt-get install git -y
进行安装。
配置用户信息
之后你需要配置用户信息。执行:
$ git config --global user.name "pluvet"
$ git config --global user.email pluvet@foxmail.com
填写你自己的用户名和邮箱。这里的信息建议和你的 Github 账号一致。
配置代理
1$ git config --global https.proxy http://192.168.56.1:10809
2
3$ git config --global https.proxy http://192.168.56.1:10809
创建仓库
仓库(Repository)是被 Git 管理的一个目录。当一个目录变成仓库之后,我们可以在里面使用 Git 的命令跟踪文件的增减和变更。
我们创建一个文件夹,并进入它:
1pluvet@localos:~$ mkdir learn-git
2pluvet@localos:~$ cd learn-git/
然后我们在里面创建一个文件夹(作为仓库),并进入它:
1pluvet@localos:~/learn-git$ mkdir my-repo
2pluvet@localos:~/learn-git$ cd my-repo/
这个时候,它还只是一个普通文件夹。要变成 Git 可管理的仓库,执行:
1pluvet@localos:~/learn-git/my-repo$ git init
2Initialized empty Git repository in /home/pluvet/learn-git/my-repo/.git/
现在,仓库就初始化完毕了。
添加文件
从工作目录到暂存区
创建一个文本文件:
1pluvet@localos:~/learn-git/my-repo$ vi hello.txt
写入内容:
This is a sample file.
保存。现在 hello.txt 已经位于 工作目录(Working Directory) 了。
现在,要让 Git 仓库托管这个文件,需要使用 add 命令将其添加到暂存区(Stage,也叫索引):
1pluvet@localos:~/learn-git/my-repo$ git add hello.txt
添加命令:添加一个或者多个文件到索引(暂存区)。
git add <filename>
git add *
从暂存区到本地仓库
下面将代码从暂存区提交到本地仓库:
1pluvet@localos:~/learn-git/my-repo$ git commit -m "add: hello.txt"
2[master (root-commit) 9ec197f] add: hello.txt
3 1 file changed, 1 insertion(+)
4 create mode 100644 hello.txt
提交命令:将变更提交到本地仓库。
git commit -m "提交说明"
从本地仓库到远程仓库
下面还可以继续提交到远程仓库。不过,我们还没有一个远程仓库。现在我们创建一个。
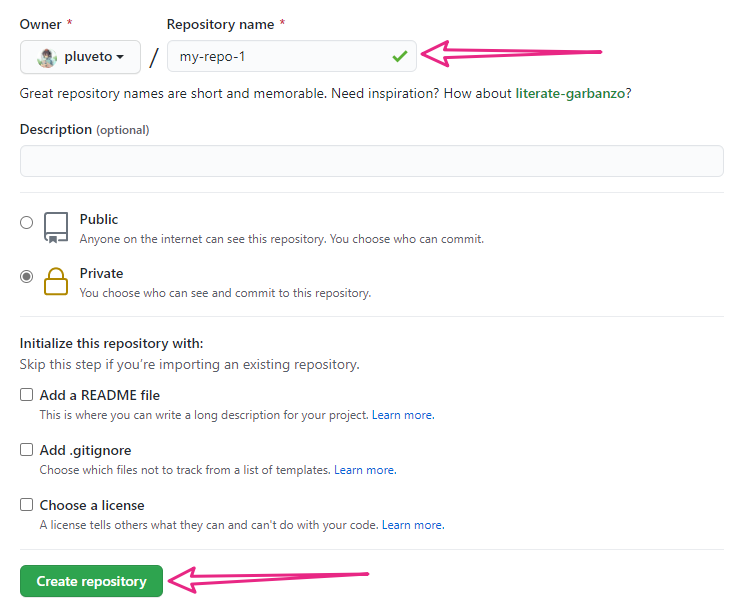
访问 Create a New Repository (github.com),如下图填写仓库名称,点击 Create repository:
片刻之后可以看到创建好的仓库。我们复制仓库的地址:

执行:
1pluvet@localos:~/learn-git/my-repo$ git remote add origin https://github.com/pluveto/my-repo-1.git
即可添加远程仓库,为这个远程仓库 https://github.com/pluveto/my-repo-1.git 取别名为 origin。
执行:
git push --set-upstream origin master
即可推送到远程仓库。其中 --set-upstream origin master 表示设定 origin 为上游仓库(注意:origin表示的是远程仓库,是我们上一步自己取的名字),而后面的 master 是 git push 的参数。之所以要设置 上游仓库 是为了保证 Git 知道要推送到哪里。因为 一个代码库可以推送到多个上游,比如你可以推送到 Gitee 和 Github。当设置了一次上游仓库,以后再执行推送,就不用指名了,就默认用第一次设置的了。也就是以后推送就可以执行:
git push --set-upstream origin master
有的说法是上游分支,但是这个说法不准确,因为后面的一个仓库里面也有不同的分支(branch),所以还是叫上游仓库不会误导读者。
推送命令:将本地仓库推送到远程仓库。
git push origin master
origin是上游仓库名,master是推送的分支名。这条命令可以省略为:git push
向上推送小结
现在我们总结一下:
-
创建文件后,文件保存在 工作目录。
-
通过
add命令,添加文件到 暂存区。 -
通过
commit命令,提交文件到 本地仓库。 -
通过
push命令,推送文件到 远程仓库。
请记住三个区、远程仓库的关系:工作目录→暂存区→本地仓库→远程仓库
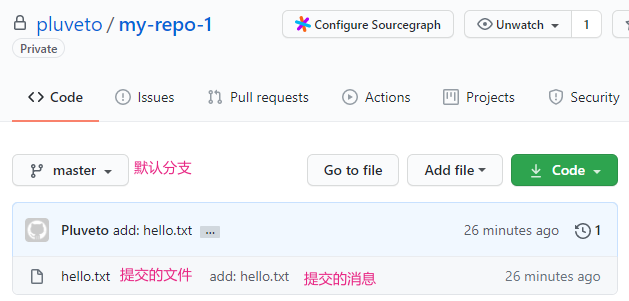
在浏览器访问你的仓库链接,可以看到:
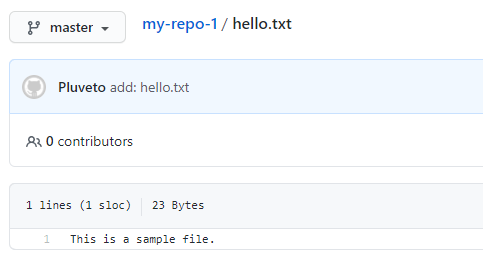
点进 hello.txt 可以看到里面的内容:
修改文件并更新推送
创建文件 empty.c,写入:
1int main() { return 0; }
创建文件 empty.html,写入:
1<html>
2</html>
现在我们的工作目录有这些文件:
1pluvet@localos:~/learn-git/my-repo$ ls -a
2.  ..  empty.c  empty.html  .git  hello.txt
批量添加索引
因为我们新增了两个文件,所以把它们添加到索引:
1pluvet@localos:~/learn-git/my-repo$ git add .
git add .表示将当前目录的所有文件都添加到暂存区(除了.gitignore中排除的文件,关于.gitignore的用法,将会在后续讲到)
现在,执行 git status,可以看到:
1pluvet@localos:~/learn-git/my-repo$ git status
2On branch master
3Your branch is up to date with 'origin/master'.
4
5Changes to be committed:
6  (use "git restore --staged <file>..." to unstage)
7        new file:   empty.c
8        new file:   empty.html
需要提醒的是,git add . 只作用于当前已有的文件。如果我们新建一个空文件,名为 undo:
 1pluvet@localos:~/learn-git/my-repo$ touch undo
 2pluvet@localos:~/learn-git/my-repo$ git status
 3On branch master
 4Your branch is up to date with 'origin/master'.
 5
 6Changes to be committed:
 7  (use "git restore --staged <file>..." to unstage)
 8        new file:   empty.c
 9        new file:   empty.html
10
11Untracked files:
12  (use "git add <file>..." to include in what will be committed)
13        undo
你会看到,undo 位列 Untracked files 名单之中,也就是没有被索引。所以我们要添加到索引:
 1pluvet@localos:~/learn-git/my-repo$ git add undo
 2pluvet@localos:~/learn-git/my-repo$ git status
 3On branch master
 4Your branch is up to date with 'origin/master'.
 5
 6Changes to be committed:
 7  (use "git restore --staged <file>..." to unstage)
 8        new file:   empty.c
 9        new file:   empty.html
10        new file:   undo
撤销索引
现在我们反悔了,不想索引 undo 文件了,怎么办?执行:
 1pluvet@localos:~/learn-git/my-repo$ git reset undo
 2pluvet@localos:~/learn-git/my-repo$ git status
 3On branch master
 4Your branch is up to date with 'origin/master'.
 5
 6Changes to be committed:
 7  (use "git restore --staged <file>..." to unstage)
 8        new file:   empty.c
 9        new file:   empty.html
10
11Untracked files:
12  (use "git add <file>..." to include in what will be committed)
13        undo
重置命令:回退命令。
git reset <filename>
提交到本地仓库
1pluvet@localos:~/learn-git/my-repo$ git commit -m "add: two empty source files"
撤销提交
这个时候我们发现代码需要修改,想撤销提交,怎么办?执行:
1pluvet@localos:~/learn-git/my-repo$ git reset --soft HEAD^
回档操作总结
你可能会疑问:前面撤销 add 操作,和这里撤销 commit,用的都是 reset ,区别何在?
我们先解释一下命令参数的含义。
1$ git reset 某个版本 某个文件
表示重置到”某个版本“。当”某个版本“不填写的时候,就默认是 HEAD. 某个文件就默认是 .,即当前目录所有文件。
HEAD 表示当前版本。
HEAD 说明:
HEAD 表示当前版本
HEAD^ 上一个版本
HEAD^^ 上上一个版本
HEAD^^^ 上上上一个版本
以此类推…
可以使用 ~数字表示
HEAD~0 表示当前版本
HEAD~1 上一个版本
HEAD^2 上上一个版本
HEAD^3 上上上一个版本
以此类推…
其实 HEAD 就是链表的头指针,指向当前的
commit。
当我们撤销 add 的时候
git reset:相当于 git reset HEAD .,即:回退所有文件到当前版本,清空暂存区。
工作目录→暂存区→本地仓库→远程仓库
           ↑
        作用最深位置
当我们撤销 commit 的时候
git reset --soft HEAD~1:相当于 git reset --soft HEAD~1 .,即回退所有文件到当前版本,但是不清空暂存区。也就是暂存区 add 的文件都还在。
工作目录→暂存区→本地仓库→远程仓库
                 ↑
              作用最深位置
当我们使用 –hard 参数的时候
git reset --hard HEAD~1:相当于 git reset --hard HEAD~1 .,即回退所有文件到当前版本,并且连暂存区、工作目录的文件也一并回档。
工作目录→暂存区→本地仓库→远程仓库
    ↑
作用最深位置
这种操作在以后撤回 merge 的时候也会用到。
查看提交历史
现在,重新添加上两个文件,并提交。然后执行:
 1pluvet@localos:~/learn-git/my-repo$ git log
 2commit 3e19b2abb94d4c579023acccb300b53b186fcdde (HEAD -> master)
 3Author: Pluveto <receding@protonmail.ccom>
 4Date:   Sun Jan 24 12:12:07 2021 +0800
 5
 6    add: two empty source files
 7
 8commit 9ec197f9b29bc6b5f432e4f90bd389372a73747d (origin/master)
 9Author: Pluveto <receding@protonmail.ccom>
10Date:   Sat Jan 23 20:20:56 2021 +0800
11
12    add: hello.txt
可以看到提交的历史。git log 的详细用法,见:Git - 查看提交历史 (git-scm.com)。
之后,我们推送到服务器:
1pluvet@localos:~/learn-git/my-repo$ git push
2Enumerating objects: 5, done.
3Counting objects: 100% (5/5), done.
4Compressing objects: 100% (2/2), done.
5Writing objects: 100% (4/4), 368 bytes | 368.00 KiB/s, done.
6Total 4 (delta 0), reused 0 (delta 0), pack-reused 0
7To https://github.com/pluveto/my-repo-1.git
8   9ec197f..3e19b2a  master -> master
这里,
git push是git push origin master的缩写。origin是我们给远程仓库取的名。master是我们推送分支的名。
拉取文件
在 Github 上添加文件
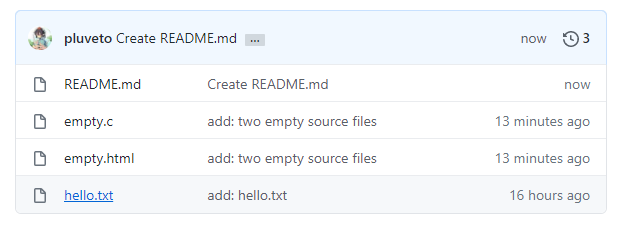
在 Github 上访问我们的仓库:

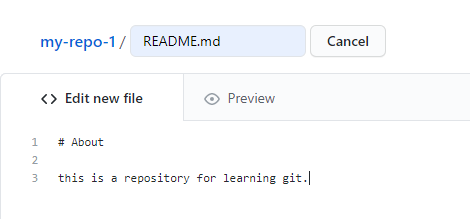
点击上面的 Add file 按钮,新增一个文件,名为 README.md。内容自己写~
然后在下方提交:
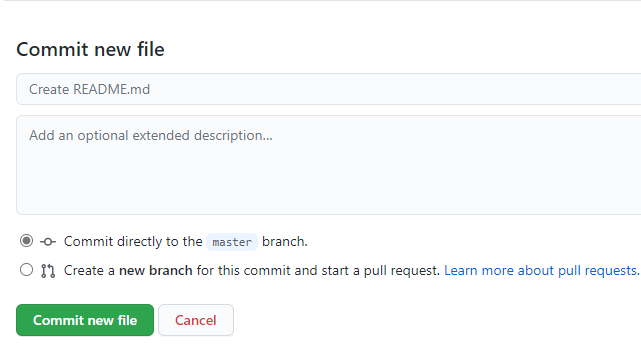
你可以发现,实际上 github 帮助你创建了文件,然后帮你 add 和 commit 你编辑好的文件。和我们用命令操作是一样的。
在 Github 上修改文件
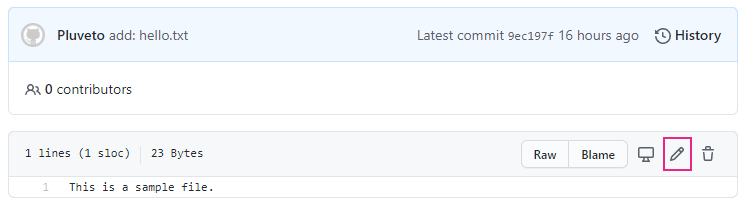
点击 hello,txt:
点击编辑按钮:
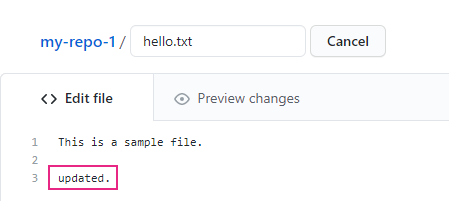
往里面写一句话,然后提交:
处理版本冲突
现在,把 undo 文件也添加进来:
1pluvet@localos:~/learn-git/my-repo$ git add undo
并提交到本地仓库:
1pluvet@localos:~/learn-git/my-repo$ git commit -m "add: undo"
2[master 2d3b5d3] add: undo
3 1 file changed, 0 insertions(+), 0 deletions(-)
4 create mode 100644 undo
然后推送到远程仓库:
1pluvet@localos:~/learn-git/my-repo$ git push
2To https://github.com/pluveto/my-repo-1.git
3 ! [rejected]        master -> master (fetch first)
4error: failed to push some refs to 'https://github.com/pluveto/my-repo-1.git'
5hint: Updates were rejected because the remote contains work that you do
6hint: not have locally. This is usually caused by another repository pushing
7hint: to the same ref. You may want to first integrate the remote changes
8hint: (e.g., 'git pull ...') before pushing again.
9hint: See the 'Note about fast-forwards' in 'git push --help' for details.
看,报错了。这是因为产生了冲突。我们分析一下冲突如何产生的:
-
假设本来的版本是 A
-
你在 Github 网站上进行了两次提交,版本变成了 B,然后变成了 C。
-
你在本地仓库上进行了一次提交,版本从 A 变成了 D
-
而你想把 D 推送到远程仓库,远程仓库的上一版本已经不是 A 了,冲突。
我们执行:
1pluvet@localos:~/learn-git/my-repo$ git fetch
2remote: Enumerating objects: 8, done.
3remote: Counting objects: 100% (8/8), done.
4remote: Compressing objects: 100% (4/4), done.
5remote: Total 6 (delta 1), reused 0 (delta 0), pack-reused 0
6Unpacking objects: 100% (6/6), 1.35 KiB | 1.35 MiB/s, done.
7From https://github.com/pluveto/my-repo-1
8   3e19b2a..176332b  master     -> origin/master
这里 git fetch 是 git fetch orgin 的缩写,后者也是 git fetch orgin/master 的缩写。
发生了什么?orgin 是远程代码库,master 是操作的分支。执行这个命令,就是从名(alias)为 origin 的远程仓库的 master 分支拉取数据到本地代码库的 master 分支。
然后我们执行:
1pluvet@localos:~/learn-git/my-repo$ git merge
2Merge made by the 'recursive' strategy.
3 README.md | 3 +++
4 hello.txt | 2 ++
5 2 files changed, 5 insertions(+)
6 create mode 100644 README.md
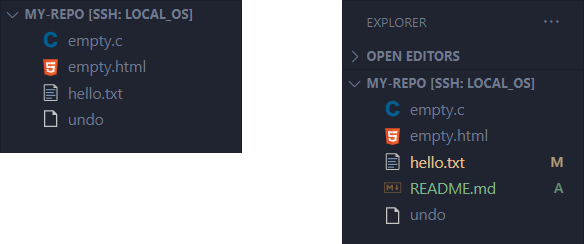
将刚才下载到本地仓库的文件合并到我们的工作目录。可以观察 merge 前后的文件结构:
发生了什么呢?git merge 是 git merge HEAD 的缩写。表示将指定的分支(HEAD,现在表示从远程下载过来的 master 分支)合并到当前的分支(本地的 master 分支)。
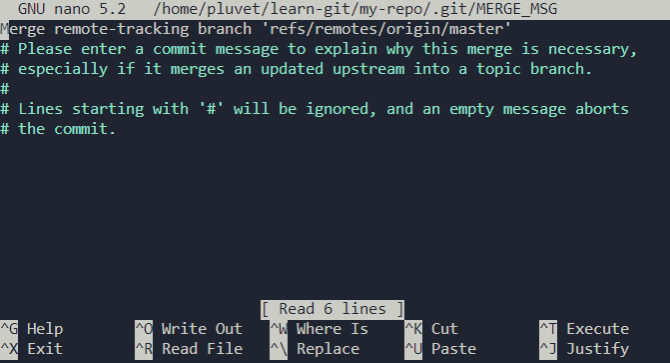
注:执行
git merge之后,你可能会看到下面的界面:
这是 nano 编辑器。下面两行显示了操作,
^X就表示 Ctrl+X。之所以会出现这个,是要你在里面写上 Merge 操作的原因。我们按下 Ctrl+O 保存,在出现的框中,回车确认文件名,然后 Ctrl+X 退出即可。
有时候我们会误操作,如何回撤 Merge 呢?执行 git reset --hard HEAD~1 即可(前面回档操作介绍过)。执行之后,merge 下来的文件也会被删除。
现在 merge 之后,冲突已经不存在了。(其实还有一种比较麻烦的情况,就是远程和本地都同时修改了同一个文件,这个时候需要手动处理冲突,在后续章节将会说明。)
然后,我们就可以 push 到远程仓库了:
1pluvet@localos:~/learn-git/my-repo$ git push
2Enumerating objects: 7, done.
3Counting objects: 100% (7/7), done.
4Compressing objects: 100% (4/4), done.
5Writing objects: 100% (5/5), 553 bytes | 553.00 KiB/s, done.
6Total 5 (delta 2), reused 0 (delta 0), pack-reused 0
7remote: Resolving deltas: 100% (2/2), completed with 2 local objects.
8To https://github.com/pluveto/my-repo-1.git
9   176332b..0092920  master -> master
新增的 undo 文件在 Github 上可以看到了:

总结一下,我们是如何解决冲突的:
-
git fetch下载到本地仓库。 -
git merge将新代码和旧代码合并。 -
git push推送合并后的代码。
其中,git fetch 和 git merge 可以简写为一条指令:git pull。
这里,我们已经初步接触了 Git 的分支的概念。下面将深入学习分支。
分支
有时候,你的软件需要增加一些功能,而增加这个功能需要多次提交代码。为了不影响现有的产品,就可以建立一个分支,等开发、测试完毕了,再合并到主干。现在,让我们从一个现有的代码库开始。
复制代码库
访问 incolore-team/asc-table: This repo is for learning git (github.com),你将会看到一个现有的代码库。但是你对其没有控制权。点击右上角的 Fork:

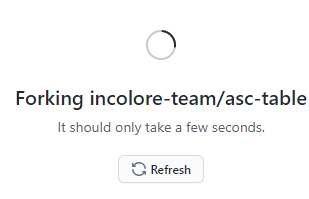
等待 Fork 完成:
将会将这个仓库复制一份到你的名下:

克隆仓库
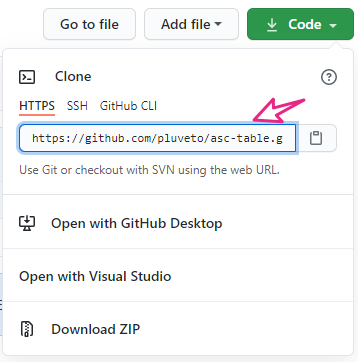
现在复制到你名下的仓库,你是有控制权的。我们如何在本机上编辑这个代码库的代码呢?点击 ↓ Code 按钮,复制里面的链接:
然后执行:
pluvet@localos:~/learn-git$ git clone https://github.com/pluveto/asc-table.git
Cloning into 'asc-table'...
remote: Enumerating objects: 4, done.
remote: Counting objects: 100% (4/4), done.
remote: Compressing objects: 100% (3/3), done.
remote: Total 4 (delta 0), reused 4 (delta 0), pack-reused 0
Unpacking objects: 100% (4/4), 471 bytes | 471.00 KiB/s, done.
克隆指令:将远程代码仓库下载到本地。
git clone <url>
进入克隆下来的工作目录:
1pluvet@localos:~/learn-git$ cd asc-table/
列出文件:
1pluvet@localos:~/learn-git/asc-table$ ls -al
2total 20
3drwxrwxr-x 3 pluvet pluvet 4096  1月 24 14:39 .
4drwxrwxr-x 4 pluvet pluvet 4096  1月 24 14:39 ..
5drwxrwxr-x 8 pluvet pluvet 4096  1月 24 14:39 .git
6-rw-rw-r-- 1 pluvet pluvet    5  1月 24 14:39 .gitignore
7-rw-rw-r-- 1 pluvet pluvet  453  1月 24 14:39 program.cpp
可以看到一个 .git 目录,一个 .gitignore 文件,以及 program.cpp 文件。
关于 .git 目录,涉及到 Git 的底层原理,感兴趣的可以阅读:Git - 底层命令与上层命令 (git-scm.com)
.gitignore 文件表示在 git add 时忽略的文件,一般会写入一些临时文件、临时文件夹等。关于编写这个文件的规则,你可以阅读:Git - gitignore Documentation (git-scm.com)
我们查看这个文件的内容:
1pluvet@localos:~/learn-git/asc-table$ cat .gitignore
2a.out
里面写了 a.out ,说明忽略 a.out 这个文件。
查看有哪些分支
执行:
1pluvet@localos:~/learn-git/asc-table$ git branch
2* main
新增分支
执行:
1pluvet@localos:~/learn-git/asc-table$ git branch br1
2pluvet@localos:~/learn-git/asc-table$ git branch
3  br1
4* main
重命名分支
1pluvet@localos:~/learn-git/asc-table$ git branch -m br1 branch_1
2pluvet@localos:~/learn-git/asc-table$ git branch
3branch_1
4* main
为当前分支重命名,则是:
1pluvet@localos:~/learn-git/asc-table$ git branch -M main
参考
GitHub 漫游指南 – GitHub 漫游指南 (phodal.com)
Git 与 GitHub 入门实践_Git - 蓝桥云课 (lanqiao.cn)
git - What does ‘–set-upstream’ do? - Stack Overflow
Git 里面的 origin 到底代表啥意思? - 知乎 (zhihu.com)
How To Set Upstream Branch on Git – devconnected
创建版本库 - 廖雪峰的官方网站 (liaoxuefeng.com)
Basic Git commands | Bitbucket Data Center and Server 7.9 | Atlassian Documentation